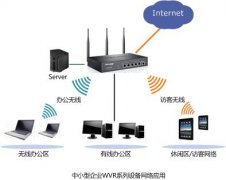
无线网络的移动便利性和高速传输特性,为中小企业的办公网络提供更灵活、便捷的组网和接入方式。企业无线网络对安全性、稳定性和传输速率方面需求更高,TP-LINK针对中小型企业用......
华为AP4050DN-E console登录无线AP密码忘记了怎么办?
路由器教程
2023-12-02
一、客户需求
华为AP4050DN-E console登录无线AP密码忘记了怎么办?
console登录无线AP要密码。
如何恢复华为AP4050DN-E
4:室内低密度
0:内置天线1外置天线
5:第二代AC产品
0:预留位
D:双频
N:普通天线E:智能天线
二、解决办法
第一种解决办法:长按Default按钮
如果所有密码均遗忘,对于有Default按钮的设备,可以长按Default按钮3s以上恢复出厂配置,设备的用户名和密码将恢复为缺省值;对于没有Default按钮的设备,请看以下解决办法。
可以直接恢复出厂设置。
修改完密码后,一定要保存。
第二种破解方法:在BIOS下配置跳过Console口密码启动后,重新设置Console口密码
设备的BIOS提供了配置跳过Console口密码启动的功能,可以在用户使用Console口登录的时候跳过密码检查。这样系统启动后除了不需要输入Console密码外,与正常启动相同,也会完成所有配置加载。设备启动后修改Console口密码,然后保存配置。
跳过密码检查存在安全风险,请务必保存好您的BootROM密码。
要进入到BIOS菜单需要重启设备,会导致业务中断,请视具体情况做好设备数据备份,并尽量选择业务量较少的时间操作。
清空Console口密码登录后请马上配置新的密码,否则登录超时或重启后,仍需要清空密码来登录。
在此操作过程中不要对设备进行下电。
用串口线连接并重启设备,出现“Press CTRL+B to enter BIOS menu”打印信息时,按下“Ctrl+B”并键入密码后进入BIOS主菜单。
用串口线连接设备的方法请参见通过Console口连接设备。
不同版本的BootROM密码可能不同,具体可参见AC和AP的缺省用户名和密码。
配置跳过Console口密码登录。
输入BIOS菜单中“Clear password for console user”对应的序号,清除Console口密码。
输入BIOS菜单中“Boot with default mode”对应的序号,以缺省模式启动设备。
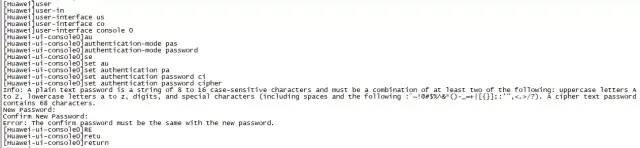
完成系统启动后,通过Console口登录时不需要认证,登录后修改Console口密码。此处以登录认证模式为password模式,密码为“huawei 123”为例。
不同版本中设置本地验证密码的命令有所不同:
<Huawei>system-view[Huawei]user-interface console 0[Huawei-ui-console0]authentication-mode password[Huawei-ui-console0]set authentication password cipher Enter Password
<6-16>
://此处提示信息以设备实际显示为准
Confirm Password:
[Huawei-ui-console0]return
V200R002及之前版本:set authentication password[cipher password]
V200R003及之后版本:set authentication password cipher
为了防止重启后配置丢失,执行save命令保存配置。
图片
BIOS主菜单
BIOS主菜单集成了BIOS程序的主要功能,并且是装备菜单的入口。
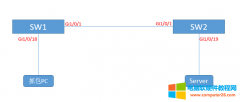
通过Console口连接设备。
图片
Console口连接方式请参见配置用户通过Console口登录设备。
重启设备,在设备出现提示信息时按Ctrl+B,进入BIOS主菜单。
BIOS主菜单
BIOS主菜单集成了BIOS程序的主要功能,并且是装备菜单的入口。
通过Console口连接设备。
Console口连接方式请参见配置用户通过Console口登录设备。
重启设备,在设备出现提示信息时按Ctrl+B,进入BIOS主菜单。
Press CTRL+B to enter BIOS menu:1
Password:
Info:You are advised to change the password to ensure security.
BIOS Menu
Version:072
1.Boot with default mode
2.Enter serial submenu
3.Enter startup submenu
4.Enter ethernet submenu
5.Enter file system submenu
6.Modify BOOTROM password
7.Clear password for console user
8.Config HigMem to Flash Flag
9.Reboot
Press CTRL+E to enter Diag menu
Enter your choice
1-9
:
重新启动4050DN-E后,出现的重启界面中没有CTRL+B选项,可以进入BIOS菜单。
重新启动AP。
Welcome To HUAWEI Wlan World
U-Boot 428
Apr-25-2017-06:18:05
BOOT:Secondary
USB0:USB XHCI 1.00
0 Storage Device
s
found
Press CTRL+T for Full Memory Test in 1 Seconds:0
Net:Ethernet Mac:4C-FA-CA-65-2F-E0
PHY ID1:0x4d
PHY ID2:0xd0b1
ipq40xx_ess_sw_init done
eth0
Boot Kernel A Address:0x1c9e000
Boot Kernel B Address:0x3c9e000
Start Up time
s
:1
Image:Current Bootup is B
Image:Current Bootup is B
POST test:Begin
Testing DDR:Passed.
Testing Nor Flash:Passed.
Testing PHY0:Passed.
Testing PHY1:Passed.
Testing PHY2:Passed.
Testing PHY3:Passed.
Testing PHY4:Passed.
Saving POST results:Done
POST test:End
Press f or F to stop Auto-Boot in 3 seconds:0 f或F
##Booting kernel from FIT Image at 84000000...
Using'config 1'configuration
Trying'kernel 1'kernel subimage
Description:ARM OpenWrt Linux-3.10.62
Type:Kernel Image
Compression:lzma compressed
Data Start:0x840000e4
Data Size:1948139 Bytes=1.9 MB
Architecture:ARM
OS:Linux
Load Address:0x80208000
Entry Point:0x80208000
Hash algo:crc32
Hash value:cab5b531
Hash algo:sha1
Hash value:29e596152b2ae74b7a7d37b0d28d0d262a759a8a
Verifying Hash Integrity...crc32+sha1+OK
##Flattened Device Tree from FIT Image at 84000000
Using'config 1'configuration
Trying'fdt 1'FDT blob subimage
Description:ARM OpenWrt qcom-ipq40xx-ap.dk01.1-c1 device tree blob
Type:Flat Device Tree
Compression:uncompressed
Data Start:0x841dbc14
Data Size:33752 Bytes=33 KB
Architecture:ARM
Hash algo:crc32
Hash value:5d5bb06e
Hash algo:sha1
Hash value:4fe758c0eeecbf794464de6bbd24470454be60e6
Verifying Hash Integrity...crc32+sha1+OK
Booting using the fdt blob at 0x841dbc14
Uncompressing Kernel Image...OK
Loading Device Tree to 87223000,end 8722e3d7...OK
ipq:fdt fixup unable to find compatible node
Linux version 3.10.62-ltsi-WR6.0.0.21_standard
root SZV1000141398
gcc version 4.8.1
GCC
#1 SMP PREEMPT Tue Apr 25 06:03:45 CST 2017
CPU:ARMv7 Processor[410fc075]revision 5
ARMv7
,cr=10c5387d
CPU:PIPT/VIPT nonaliasing data cache,VIPT aliasing instruction cache
Memory policy:ECC disabled,Data cache writealloc
Built 1 zonelists in Zone order,mobility grouping on.Total pages:61696
Kernel command line:console=ttyMSM0,9600n8 root=/dev/mtdblock22 rootfstype=squashfs rdinit=/sbin/init clk_ignore_unused
FWD_MEM:aligned address c8000000
FWD_MEM:88000000
FWD_MEM:Allocating 68MB
17408 pages
of memory at addr c8000000
Memory:170852k/170852k available,91292k reserved,0K highmem
Virtual kernel memory layout:
vector:0xffff0000-0xffff1000
4 kB
fixmap:0xffc00000-0xfff00000
3072 kB
vmalloc:0xd0800000-0xff000000
744 MB
lowmem:0xc0000000-0xd0000000
256 MB
pkmap:0xbfe00000-0xc0000000
2 MB
modules:0xbf000000-0xbfe00000
14 MB
.text:0xc0208000-0xc06c6e5c
4860 kB
.init:0xc06c7000-0xc06e8d80
136 kB
.data:0xc06ec000-0xc0738bc0
307 kB
.bss:0xc0738d48-0xc07b5074
497 kB
CPU1:Booted secondary processor
CPU2:Booted secondary processor
CPU3:Booted secondary processor
SCSI subsystem initialized
msm_serial_hsl_probe:Bus scaling is disabled
sps:BAM device 0x07884000 is not registered yet.
23 ofpart partitions found on MTD device spi0.0
Creating 23 MTD partitions on"spi0.0":
0x000000000000-0x000000040000:"0:SBL1"
0x000000040000-0x000000080000:"0:MIBIB"
0x000000080000-0x000000100000:"0:QSEE"
0x000000100000-0x000000140000:"0:CDT"
0x000000140000-0x000000180000:"0:DDRPARAMS"
0x000000180000-0x000000280000:"0:APPSBL"
0x000000280000-0x0000002c0000:"0:ART"
0x0000002c0000-0x000000300000:"0:APPSBLENV"
0x000000300000-0x000000380000:"ResultA"
0x000000380000-0x000000600000:"configA"
0x000000600000-0x000000700000:"bootimageA"
0x000000700000-0x000002000000:"SysImageA"
0x000002000000-0x000002040000:"1:SBL1"
0x000002040000-0x000002080000:"1:MIBIB"
0x000002080000-0x000002100000:"1:QSEE"
0x000002100000-0x000002140000:"1:CDT"
0x000002140000-0x000002180000:"1:DDRPARAMS"
0x000002180000-0x000002280000:"1:APPSBL"
0x000002280000-0x000002300000:"Reservel"
0x000002300000-0x000002380000:"ResultB"
0x000002380000-0x000002600000:"configB"
0x000002600000-0x000002700000:"bootimageB"
0x000002700000-0x000004000000:"SysImageB"
Concatenating MTD devices:
0
:"configA"
1
:"configB"
into device"configA_merge"
Concatenating MTD devices:
0
:"1:SBL1"
1
:"1:MIBIB"
2
:"1:QSEE"
3
:"1:CDT"
4
:"1:DDRPARAMS"
5
:"1:APPSBL"
into device"UBOOT"
QCE50:__qce_init_clk:Unable to get CE core src clk,set to NULL
bus_scale_table is NULL
Registering SWP/SWPB emulation handler
clk:Not disabling unused clocks
Bad inittab entry at line 10
Bad inittab entry at line 11
starting pid 89,tty'':'-/etc/init.d/rcS'
MIMC_KERNEL:Module init.
diag_log:module license'unspecified'taints kernel.
Disabling lock debugging due to kernel taint
bsp_adapter module:init
Insmod I2C
Initializing arch flag Done.
ipq40xx-pinctrl 1000000.pinctrl:pin GPIO_63 already requested by 1000000.pinctrl:63;cannot claim for 1000000.pinctrl:63
ipq40xx-pinctrl 1000000.pinctrl:pin-63
1000000.pinctrl:63
status-22
/etc/rcS.d/S10startup.sh:line 46:can't create/sys/devices/soc.0/1000000.pinctrl/gpio/gpio63/direction:nonexistent directory
ess-switch DT exist!
switchreg_base_addr:0xc000000
switchreg_size:0x80000
switch_access_mode:local bus
wan bmp:0x20
ess-psgmii DT exist!
mac mode=0
current mac mode=0
current dts led_source_num is 0
mdio DT exist!
ssdk_plat_init start
enable ess clk
reset ok in probe!
chip_ver is 0x14
PHY ID is 0x4dd0b1
qca probe malibu phy driver succeeded!
Dakota Chip version 0x1401
qca-ssdk module init succeeded!
########32Bit Kernel##########
########MSS Memory Device register success########
MSS_PUB Version[1.07],build on Date:[Apr 24 2017],Time:[22:19:09]
edma module_init
Insmod ipq eth module OK.
Drv_ap_api module:Init
jffs2:notice:
137
jffs2_build_xattr_subsystem:complete building xattr subsystem,0 of xdatum
0 unchecked,0 orphan
and 0 of xref
0 dead,0 orphan
found.
wifi pub bdinfo attach success
ProductName:AP4050DN-E ProductId:61 WirlessMac:4cfa-ca65-2fe0
CountryStr:CN CountryCode:156
BoardMaxUserNum:256
RadioId:0 RadioMaxNodeNum:160 RadioMaxUserNum:128
RadioId:0 DrvType:2 FlashFreqband:0
RadioId:1 RadioMaxNodeNum:160 RadioMaxUserNum:128
RadioId:1 DrvType:2 FlashFreqband:1
set ulMcThValue:512
Init wmi buf pool,11ac_radio_num[2],pool_size[800]
hal stub init
rate stub init
377+0 records in
377+0 records out
12064 bytes
11.8KB
copied,0.098651 seconds,119.4KB/s
377+0 records in
377+0 records out
12064 bytes
11.8KB
copied,0.172973 seconds,68.1KB/s
ol_ath_ahb_probe
device_name=a000000.wifi device_Id=-1
ol_ath_ahb_probe:io resource start:0xa000000,mem=0xd1c00000
__ol_ath_attach
Allocated scn ce3c04c0
ol_ath_ahb_configure:MSI addr:0b006040,MSI base:00000040
Wifi0 CPU frequency 250000000
ol_ath_ahb_configure:num_desired MSI set to 0
Using Legacy Interrupt
Waiting for target init
Done waiting
Atheros Attach:dev name wifi0,radio id:0
ol_transfer_bin_file[4238]Get Caldata for wifi0.
__adf_os_fs_read[42],Open File/tmp/wifi0.caldata SUCCESS!!
file system magic:-2054924042
super blocksize:4096
inode 3075
file size:12064
Warning:No board id matched.Selecting default boarddata file
wifi0:Selecting board data file name boarddata_0.bin
ol_ath_service_ready_event[4368]WAPI MBSSID 2
ol_ath_smart_ant_attach:Firmware doest not support Smart Antenna.
ol_ath_smart_ant_attach:Hardware doest not support Smart Antenna.
init file type:0 address:0x400000 len:0x68000
init file type:1 address:0xc0000 len:0x40000
init file type:2 address:0x980000 len:0x50000
init file type:3 address:0x30000 len:0x7000
init file type:4 address:0x43000 len:0x3000
init file type:5 address:0x4a000 len:0x5000
init file type:6 address:0x80000 len:0x6000
init file type:7 address:0x3f000 len:0x3000
ath_adhoc_netlink_init[118]
huawei probe success radio:wifi0
ol_ath_ahb_probe
device_name=a800000.wifi device_Id=-1
ol_ath_ahb_probe:io resource start:0xa800000,mem=0xd2400000
__ol_ath_attach
Allocated scn cdf004c0
ol_ath_ahb_configure:MSI addr:0b006040,MSI base:00000050
Wifi1 CPU frequency 250000000
ol_ath_ahb_configure:num_desired MSI set to 0
Using Legacy Interrupt
Waiting for target init
Done waiting
Atheros Attach:dev name wifi1,radio id:1
ol_transfer_bin_file[4238]Get Caldata for wifi1.
__adf_os_fs_read[42],Open File/tmp/wifi1.caldata SUCCESS!!
file system magic:-2054924042
super blocksize:4096
inode 1154
file size:12064
Warning:No board id matched.Selecting default boarddata file
wifi1:Selecting board data file name boarddata_1.bin
ol_ath_service_ready_event[4368]WAPI MBSSID 2
ol_ath_smart_ant_attach:Firmware doest not support Smart Antenna.
ol_ath_smart_ant_attach:Hardware doest not support Smart Antenna.
init file type:0 address:0x400000 len:0x68000
init file type:1 address:0xc0000 len:0x40000
init file type:2 address:0x980000 len:0x50000
init file type:3 address:0x30000 len:0x7000
init file type:4 address:0x43000 len:0x3000
init file type:5 address:0x4a000 len:0x5000
init file type:6 address:0x80000 len:0x6000
init file type:7 address:0x3f000 len:0x3000
ath_adhoc_netlink_init[118]
huawei probe success radio:wifi1
Mount fsimage type:patch
User fs folder:/opt
Loop device:/dev/loop0
Mount folder:/mnt/patch
cap32 start,build time 22:17:09
MSS_PUB Version[1.07],build on Date:[Apr 24 2017],Time:[22:17:06]
Mss_Mem_Open:g_MssMemAddr=0x48000000,g_MssMemPhyAddr=0x88000000,g_vir2phy_off=0xffffffffc0000000
Module MEM Init......OK!
Module DIAG Init......OK!
Module PBUF Init......OK!
Module IM Init......OK!
Module IIC Init......OK!
Module HAL Init......OK!
Module Timer Init......OK!
Module TIME Init......OK!
MSS_Global_Init success!
MSC Process run on core[3],PID=[184]
MSC_TCTL_Init Succ!u32Ret=0
MSC goto scheduler!
MSS_PUB Version[1.07],build on Date:[Apr 24 2017],Time:[22:19:09]
MSS_PUB_Init Succ,ret=0
AP_Board_Cfg Succ,ret=0
Module MEM Init......OK!
Module DIAG Init......OK!
Module PBUF Init......OK!
Module IM Init......OK!
Module IIC Init......OK!
Module HAL Init......OK!
Module Timer Init......OK!
Module TIME Init......OK!
MSS_Global_Init Succ,ret=0
MSU Init OK
MSU_Init Succ,ret=0
MSS_IM_InstGlobalInit Succ,ret=0
MSS_Local_Init Succ,ret=0
msu init success!compile time:22:04:24
VOS_Start......
PPI_DEV_SysInit begin.
CDEV_InitProduct Success!
DEV_EVT_InitEvtData Success!
PPI_DEV_SysInit End.
Task GRSA Init......Ok......OK
VRP_SockTm_Init create............OK
System recover configuration.................OK!
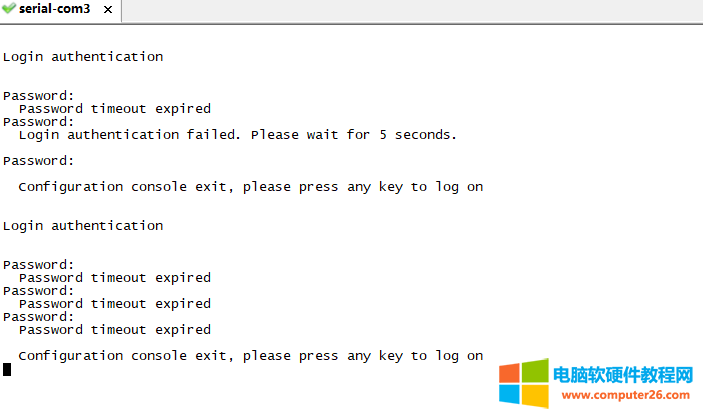
Press any key to get started
Login authentication
Password:
Password:
Password:
Login authentication failed.Please wait for 5 seconds.
图片
第三种破解方法:uBoot下配置跳过Console口密码启动后,修改Console口密码
设备的uBoot提供了配置跳过Console口密码启动的功能,可以在用户使用Console口登录的时候跳过密码检查。这样系统启动后除了不需要输入Console密码外,与正常启动相同,也会完成所有配置加载。设备启动后修改Console口密码,然后保存配置。
图片
跳过密码检查存在安全风险,请务必保存好您的BootROM密码。
要进入到uBoot视图需要重启设备,会导致业务中断,请视具体情况做好设备数据备份,并尽量选择业务量较少的时间操作。
清空Console口密码登录后请马上配置新的密码,否则登录超时或重启后,仍需要清空密码来登录。
在此操作过程中不要对设备进行下电。
用串口线连接并重启设备,出现“Press f or F to stop Auto-Boot……”打印信息时,按下“f”并键入密码后进入uBoot视图。
用串口线连接设备的方法请参见通过Console口连接设备。
不同版本的BootROM密码可能不同,具体可参见AC和AP的缺省用户名和密码。
在uBoot视图下执行defaultuser命令,清除Console口密码。
ar7240>defaultuser
Start setting whether to Change Password.....
Current Bootup Change PW is N
Do you Want To Change The Default password,Y or N:Y
ar7240>
在uBoot视图下执行reset命令,重启设备。
ar7240>reset Resetting...
完成系统启动后,通过Console口登录时不需要认证,登录后修改Console口密码。此处以登录认证模式为password模式,密码为“huawei 123”为例。
<Huawei>system-view
[Huawei]user-interface console 0
[Huawei-ui-console0]authentication-mode password
[Huawei-ui-console0]set authentication password cipher
Enter Password
<6-16>
://此处提示信息以设备实际显示为准
Confirm Password:
[Huawei-ui-console0]return
为了防止重启后配置丢失,执行save命令保存配置。
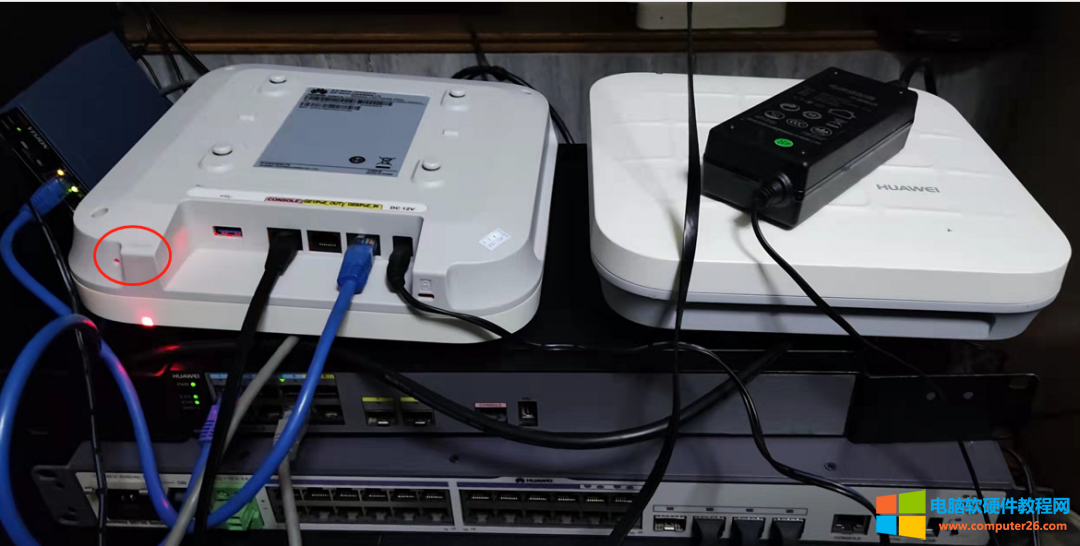
实操:
图片
admin huawei.com
图片
输入默认的Uboot密码
图片
输入defaultuser默认帐户。
图片
图片
是否要更改密码,选择Y
图片
reset重启。
图片
重新启动后,发现可以正常进入系统了,不需要输入密码了。
图片
重新设置密码。
图片
修改完密码后,一定要save一下。
图片
标签: 无线AP密码忘记了
上一篇:为什么路由器不能杀毒,而防火墙能杀毒? 下一篇:睿易无线RAC200B调试图解教程
相关文章
- 详细阅读
-
斐讯 K2 无线路由器固件升级方法图解详细教程详细阅读
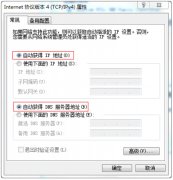
1、根据不同的操作系统,找到【本地连接】,右击【本地连接】点击【属性】,双击 TCP/IP 协议,把上下两个圆圈都改为自动获得,如下图: 2、打开任意浏览器,在地址栏输入 192.16......
2023-07-11 395 无线路由器固件升级方法
-
怎么防止路由器被入侵?详细阅读

1、在设置家用路由器的无线密码时,选择WPA2方式,密码设置得越复杂,黑客破解的难度就越高; 2、路由器管理网页登录账户、密码,不要使用默认的admin,可改为字母加数字的高强度......
2017-01-20 202 路由器被入侵
- 详细阅读
-
TP-Link TL-WDR6500 V5-V6 无线路由器上网时间控制实现教程详细阅读
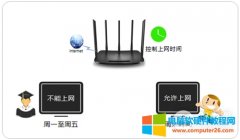
1、在浏览器输入tplogin.cn登录路由器管理界面,点击 设备管理,进入管理设置页面,如下图: 2、找到待控制主机,该页面有多个终端,找到待控制的终端,如下: 注意:可以通过IP地......
2023-07-31 229 无线路由器上网时间控制